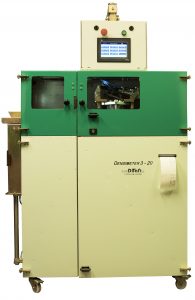
Caracteristics
- Calculation Apparent Density Ceramic Processes
- High-precision density meter
- Accuracy according to model up to ± 0.005 g/cm3
- Measured time ≈ 30 sec/specimen
- Touch screen control
- 325 mm magazine (optional) for multiple measurement
- No damage to the specimens during the process
- Calculation of ceramic specimen densities in raw, fired, porous, porcelain, reliefs
- Available in 2 models: laboratory or production
- Maintenance-free technology
Description
This machine is mainly designed for laboratory use, but can also be used in production lines to directly control the compaction of the ceramic product at the press outlet.
With a measuring chamber, the volume of the specimen is determined by compressed air. In order to prevent air from entering the porous specimens (the apparent density is searched for), the specimen is placed between two very thin rubber membranes. And so that the rubber is not a maintenance problem (the rubber can break due to fatigue after a series of tests), these membranes are installed in the form of rolls of approx. 10 metres in length and the rubbers advance automatically in the chamber about 10 to 15 mm after a series of tests (e.g. 300).
Before placing the specimens in the chamber, the weight is taken on a balance with an accuracy of 0.01 g and the density is calculated by dividing the weight by its volume.
The machine has a calibre pattern whose exact volume is known and when the machine makes a calibration (automatically or manually), measurement errors are corrected due to changes in temperature or other factors.
The accuracy of the density measurement is guaranteed by sophisticated thermocompensation. When the ambient temperature – to which the machine is exposed – changes by half a degree, a calibration is automatically performed to adjust certain parameters that serve to calculate the volume of the specimen. The result is an accurate measurement between 0.005 g/cm3 from 10 to 40 degrees ambient temperature.
A new tensioning system for the membranes always guarantees the same tension, even if the light or the compressed air of the machine has been cut off.
The laboratory version is D3-20-S (Standard, manual):
In laboratory use, the specimens have a size of 50 or 60 mm (depending on the customer’s requirements) round or square.
The specimen is automatically returned to the loading table after the test.
The production version is D3-20-A (Automatic and with printer):
This version has a storage with an effective height of 325 mm to receive specimens of pieces cut in size suitable for the measuring chamber (can be from 50×50 to 70×70 mm) according to the customer’s wishes.
A ticket printer with thermal paper is used to print a test protocol with several average values that are very interesting to interpret the state of pressing of the parts.
It is also possible to connect the machine’s PLC to the company’s database so that virtual data is always available.
The D3-20-AV version is equipped with two types of diffusers to produce two different heights of the measuring chamber: 1.5 mm thick diffusers: 11 mm chamber height. 5 or 6 mm diffusers: chamber height 18 or 20 mm.
You can work in two ways:
– Individual test: With the storage table positioned above, the machine is used for individual specimens (manual tests) and the specimens will be returned to the storage table. – Complete test: With the storage table below, all specimens from a given test are loaded into the storage and the specimens are automatically delivered piece by piece for calculation, the finished specimens are ejected through a separate door.
Outside dimensions:
Width: 870 cm
Depth: 650 cm
Height (board): 118 cm
Total height with control panel: 167 cm
The machine has 4 articulated wheels, the two front ones with brakes.

Consumption:
Alternating current (220V): less than 2 KW
Dry compressed air: 200 litres/minute aspiration. Minimum pressure 6 bar.
Installation:
Current socket: Schuco plug with earth connection,
Compressed air intake: ½ inch tube with filter and shut-off valve.
The machine is operated via a touch screen.
There are several screen menus:
Main menu:
Densimeter Manual – To move all mechanical elements manually, Submenu: Calibration
Camera Manual – To check camera operation manually
Individual test – For specimen testing on specimens
Full Test – For testing multiple parts.
Alarms: Any irregularity in operation will be announced by an alarm display.
Parameters – User adjustable parameters such as number of parts for rubber change, time for calibration, individual tares for various types of specimens etc.Automatic measuring systems with compressed air that offer the same accuracy as the mercury method.Our equipment calibrates automatically and with absolute independence from mercury.They calculate the actual volume, regardless of the shape or size of the specimens (bevelled, rustic and reliefs are measured with the same accuracy).Sophisticated thermal compensation ensures the same measurement accuracy despite temperature changes.Highly professional mechanical systems, designed by German engineers, virtually maintenance-free.Error ± 0.0045 g/cm3Touch screen control OMRON 7 “, valves and pneumatic SMC and Festo.
